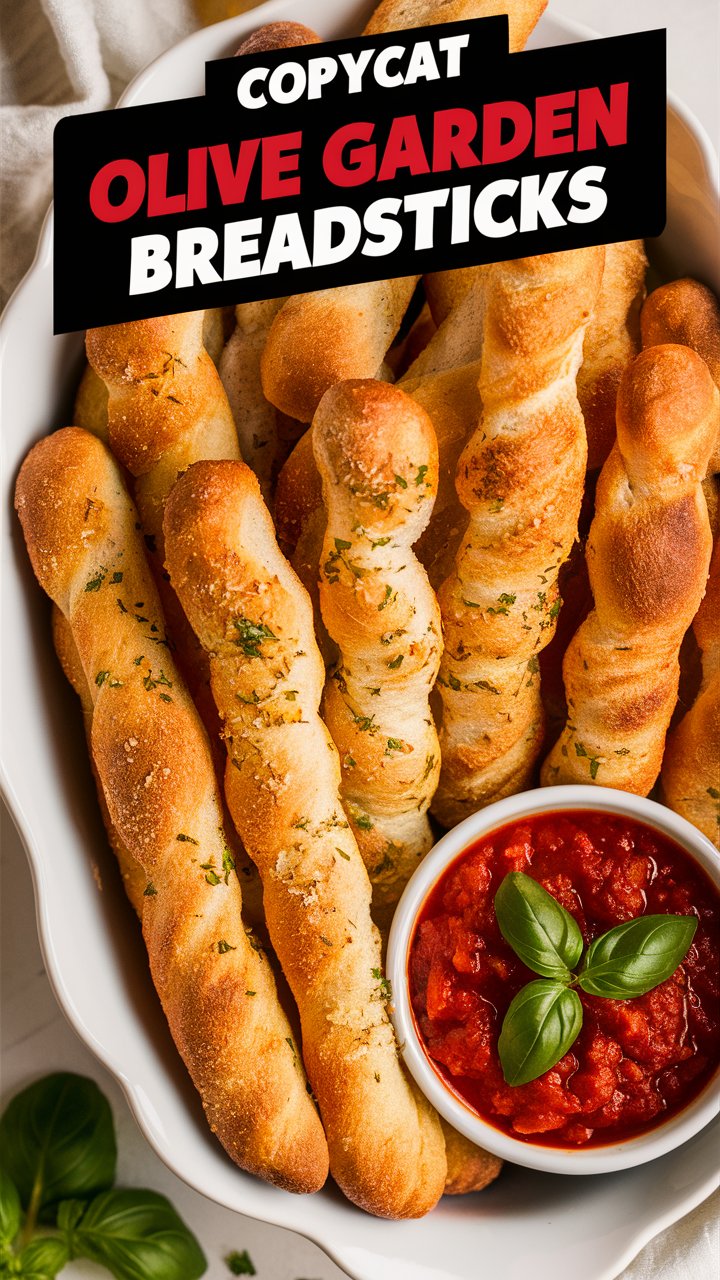
There’s nothing quite like the comforting aroma of freshly baked breadsticks filling your kitchen. Whether you’re preparing a classic Italian dinner, hosting a cozy gathering, or just craving a savory snack, these irresistibly soft homemade garlic breadsticks deliver everything you want—warmth, flavor, and a golden buttery finish that will make your kitchen smell like an authentic trattoria.
In this comprehensive guide, you’ll learn not just how to make the perfect garlic breadsticks from scratch, but how to master every detail—from dough preparation to baking tips, flavor variations, serving ideas, and storage. Designed for both beginners and seasoned home cooks, this recipe uses basic pantry ingredients while providing professional-level results.
🔥 Why You’ll Love These Garlic Breadsticks
✅ Super soft, fluffy interior with a golden crisp exterior
✅ Buttery garlic topping infused with optional herbs
✅ Simple ingredients—nothing artificial, no preservatives
✅ Perfect complement for pasta, soup, salad, or dipping sauces
✅ Beginner-friendly with expert tips for professional results
✅ Vegan and dairy-free adaptable
✅ Make-ahead and freezer-friendly
🥖 Ingredients You’ll Need
For the Dough:
- 1 cup warm water (about 110°F)
- 2 teaspoons granulated sugar
- 2¼ teaspoons active dry yeast (1 standard packet)
- 3 cups all-purpose flour (plus extra for kneading)
- 1 tablespoon kosher salt
- 3 tablespoons unsalted butter or vegan butter, melted
- 1 teaspoon olive oil (for greasing)
For the Garlic Butter Topping:
- 4 tablespoons unsalted butter or vegan substitute, melted
- 1 teaspoon garlic powder
- ½ teaspoon fine sea salt
- 1 teaspoon dried parsley or Italian seasoning (optional)
📝 Ingredient Notes & Substitutions
- Flour: You can substitute 1 cup of all-purpose flour with whole wheat for a heartier bite.
- Yeast: Ensure your yeast is active and not expired. Instant yeast can be used but skip the activation step.
- Butter: Plant-based butter works beautifully, especially for a dairy-free version.
- Garlic Powder vs Fresh Garlic: Fresh garlic adds intensity; use 2 finely minced cloves if preferred.
👩🍳 Step-by-Step Instructions
Step 1: Activate the Yeast
In a large bowl, mix the warm water and sugar. Stir to dissolve. Sprinkle the yeast on top and allow it to sit for 5–10 minutes. It should become foamy—this means the yeast is alive and active.
🔍 Pro Tip: If your mixture doesn’t foam, your yeast may be dead. Start over with a new packet.
Step 2: Prepare the Dough
Add 2½ cups of the flour, melted butter, and salt to the yeast mixture. Stir with a wooden spoon or silicone spatula until it forms a shaggy dough. Gradually add more flour until the dough becomes soft and just slightly sticky.
Step 3: Knead the Dough
Transfer the dough to a floured surface. Knead for 7–8 minutes, adding flour as necessary until the dough is smooth and elastic.
🧠 Expert Insight: Don’t add too much flour. A slightly tacky dough ensures soft breadsticks.
Step 4: First Rise
Grease a clean bowl with olive oil and place your dough inside. Turn once to coat. Cover with a clean towel or plastic wrap and let it rise in a warm, draft-free area for about 1 hour or until doubled in size.
Step 5: Shape the Breadsticks
Punch the dough down gently and divide it into 12 equal pieces. Roll each piece into a rope about 7 inches long. Place them on a parchment-lined baking sheet, leaving room to rise.
Step 6: Second Rise
Cover the shaped breadsticks loosely with a towel and let them rise again for 20 minutes. They should appear puffy and light.
Step 7: Bake
Preheat your oven to 400°F (200°C). Bake the breadsticks for 12–15 minutes or until golden brown.
Step 8: Brush with Garlic Butter
Immediately after removing the breadsticks from the oven, brush them generously with the garlic butter mixture. Sprinkle with dried parsley or herbs if desired.
🌿 Optional Add-Ins and Flavor Variations
- Cheesy Breadsticks: Add shredded mozzarella or parmesan before baking.
- Spicy Kick: Mix a pinch of chili flakes into the garlic butter.
- Herb-Infused: Add 1 teaspoon of Italian seasoning to the dough itself.
- Sweet Twist: Swap garlic butter for cinnamon-sugar butter for dessert-style sticks.
🍝 Best Ways to Serve Garlic Breadsticks
These garlic breadsticks are incredibly versatile. Here are a few pairing ideas:
- Alongside pasta dishes: like Fettuccine Alfredo or Spaghetti Bolognese.
- With soups: such as Tomato Basil Soup, Minestrone, or Creamy Broccoli Cheddar.
- Next to salads: especially Caesar or Greek salads.
- With dips: Marinara, Garlic Aioli, Ranch, or Pesto.
💡 Pro Tips for Perfect Results
- Use a kitchen thermometer: Ensure your water is 105°F–110°F.
- Don’t skip the second rise: It gives the breadsticks their signature airy texture.
- Brush while hot: The bread absorbs the garlic butter best when still warm.
- Uniform shaping: Use a kitchen scale to divide the dough evenly.
🧊 Storage and Reheating Instructions
- Room Temperature: Store in an airtight container for up to 2 days.
- Refrigeration: Keep in the fridge for up to 5 days.
- Freezing: Freeze cooled breadsticks for up to 3 months. Wrap individually or store in a zip bag.
- To Reheat: Wrap in foil and warm in a 350°F oven for 5–8 minutes, or microwave for 15 seconds (may soften texture slightly).
📊 Nutritional Breakdown (Per Breadstick)
- Calories: 170–180 kcal
- Carbohydrates: 24g
- Protein: 3g
- Fat: 7g
- Saturated Fat: 4g
- Sugar: 2g
- Sodium: 380mg
- Fiber: 1g
❓ Frequently Asked Questions
Can I make these ahead of time?
Yes! You can make the dough a day ahead and let it rise overnight in the fridge. Let it come to room temp before shaping and baking.
Can I use gluten-free flour?
You can try a 1:1 gluten-free baking flour blend, but results may vary. Avoid using almond or coconut flour alone.
How can I make them extra soft?
Brush with garlic butter before baking in addition to after, and place a tray of water in the oven for added steam.
📌 Final Thoughts
These homemade garlic breadsticks bring together everything we love about comfort food: warmth, simplicity, and mouthwatering aroma. Whether you’re looking to recreate a restaurant-style meal at home or just want a dependable side dish that will please every guest, this recipe never disappoints.
Their soft, buttery bite makes them a crowd favorite, and once you try them, you’ll never settle for store-bought again.