There’s a universal truth about snacks: they’re irresistible. Whether you’re sitting down for a movie night, reaching for a quick bite between meetings, or packing a lunchbox for your kids, snacks are part of daily life. But here’s the catch—most packaged snacks are high in sodium, unhealthy fats, and preservatives. They’re designed for flavor, not for nutrition.
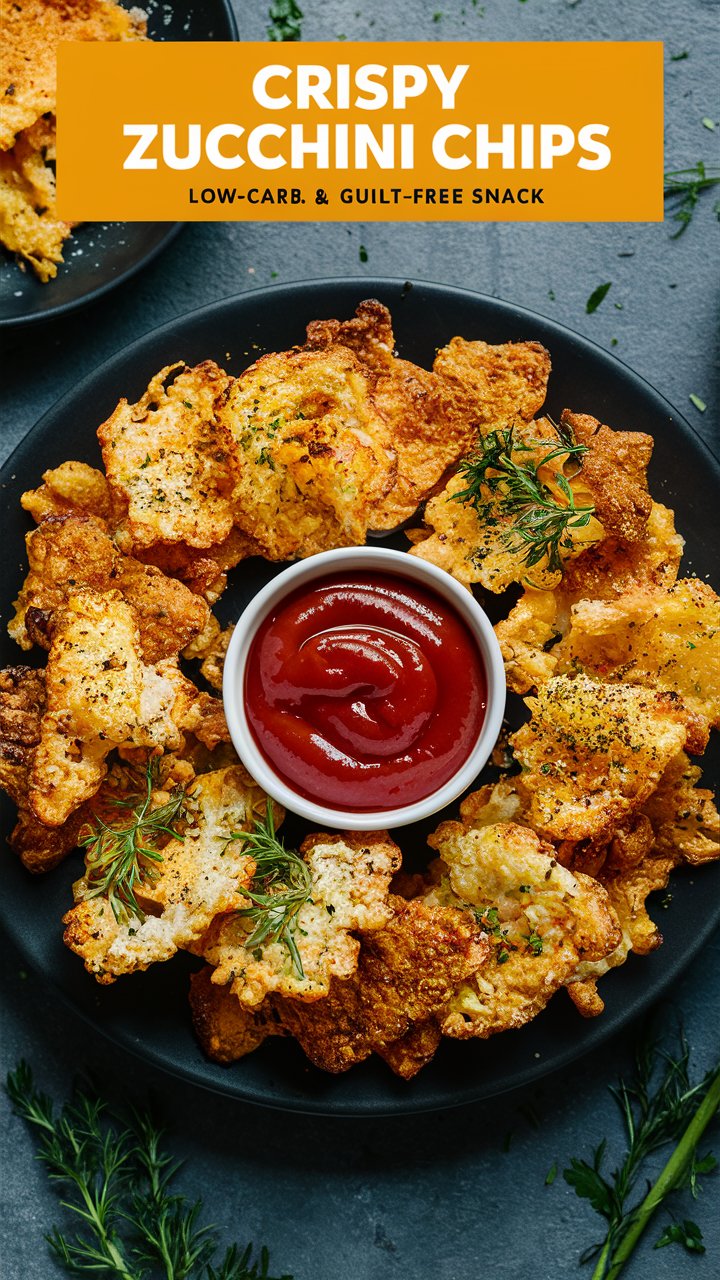
That’s where Crispy Zucchini Chips step in. Imagine a snack that delivers the crunch of potato chips but comes with fewer calories, more nutrients, and no guilt. Zucchini, one of the most versatile vegetables, shines when sliced thin, seasoned, and baked or air-fried to perfection. What you get is a golden, crisp, and flavorful chip that’s every bit as satisfying as its less-healthy counterparts.
Why Choose Zucchini Chips Over Regular Snacks?
Before diving into the recipe, let’s explore why these chips have become a favorite for health-conscious snackers.
Healthier Alternative to Potato Chips
- Calorie-light: A serving of baked zucchini chips can contain as little as 35–45 calories compared to 150–200 calories for the same number of potato chips.
- Lower fat content: Instead of deep frying, zucchini chips rely on light baking or air frying, which requires minimal oil.
- No hidden additives: Homemade zucchini chips are free from preservatives, artificial flavorings, and excessive sodium.
Packed with Nutrients
Zucchini may look ordinary, but it’s loaded with benefits:
- Vitamin A: Supports eye health and immunity.
- Vitamin C: Helps collagen production and skin repair.
- Potassium: Essential for heart and muscle function.
- Antioxidants like lutein and zeaxanthin: Protect against cell damage.
Fits Into Many Diets
Whether you’re following a low-carb plan, keto, gluten-free, paleo, or vegan diet, zucchini chips fit right in. By swapping traditional chips for these, you can enjoy crunch without compromising your lifestyle.
Budget-Friendly Snack
Zucchini is inexpensive, especially in summer when it’s in season. One or two zucchinis can yield a full tray of chips, making this a cost-effective snack compared to premium packaged alternatives.
Kid-Friendly Appeal
Children often turn up their noses at vegetables, but something magical happens when those same veggies transform into chips. The mild flavor of zucchini pairs well with kid-approved seasonings like pizza spices, cheesy blends, or even cinnamon sugar.
Ingredients You’ll Need
Basic Recipe Ingredients
- 2–3 medium zucchini (uniform in size)
- 1–2 tablespoons olive oil
- ½ teaspoon sea salt
Optional Seasonings for Flavor Boost
- Garlic powder – classic savory touch
- Smoked paprika – adds warmth and smokiness
- Black pepper – enhances flavor complexity
- Nutritional yeast – a dairy-free way to achieve a cheesy flavor
- Italian herb blend – oregano, basil, thyme, rosemary
- Cayenne pepper – for spice lovers
- Everything bagel seasoning – trendy and bold
- Lemon zest – a refreshing twist
Essential Kitchen Tools
- Mandoline slicer – ensures consistent thin slices
- Sharp knife – a reliable alternative if you don’t have a mandoline
- Cutting board – for safe slicing
- Paper towels or clean kitchen towels – to remove excess moisture
- Large bowl – for mixing with oil and seasonings
- Baking sheets – sturdy enough for long oven use
- Parchment paper or silicone baking mats – prevents sticking
- Cooling rack – allows chips to crisp evenly
Step-by-Step Instructions
Step 1: Wash and Prep
Rinse zucchini thoroughly, trim the ends, and pat dry. Smaller zucchinis are preferred since they hold less water and produce crispier chips.
Step 2: Slice Evenly
Slice into ⅛-inch-thick rounds. Thin slices crisp best, but be careful not to cut so thin that they burn easily.
Step 3: Remove Moisture
Place slices in a single layer on paper towels. Sprinkle lightly with salt and let them sit for 20 minutes. This draws out excess water. Blot the tops with more towels to dry completely.
Step 4: Season
Preheat oven to 225°F (105°C). In a mixing bowl, toss zucchini slices with olive oil and chosen seasonings. Coat lightly—too much oil makes chips soggy.
Step 5: Arrange on Baking Sheet
Line trays with parchment paper. Lay slices in a single layer, leaving space between them for airflow.
Step 6: Bake Slowly
Bake for 1.5–2.5 hours, checking at the 1-hour mark. Cooking time varies depending on slice thickness. Chips are ready when golden brown and crisp.
Step 7: Cool and Crisp
Remove from oven and let chips cool on the baking sheet or a cooling rack. They’ll continue crisping as they cool.
Air Fryer Method
For quicker results:
- Preheat air fryer to 200°F (93°C).
- Arrange zucchini slices in a single layer.
- Cook for 15–20 minutes, flipping halfway.
- Remove when crisp and let cool slightly before serving.
Pro Tips for Maximum Crispiness
- Always salt before baking: This step removes moisture and prevents sogginess.
- Consistency matters: Uneven slices mean uneven cooking.
- Less oil, more crunch: Use just enough oil to lightly coat slices.
- Low and slow: Avoid high temperatures that brown the outside too quickly.
- Ventilation hack: Prop oven door open slightly in the final 20 minutes to let steam escape.
Flavor Variations and Twists
Ranch Zucchini Chips
Season with garlic powder, onion powder, dried dill, and parsley.
Spicy Taco Zucchini Chips
Use chili powder, cumin, paprika, and cayenne.
Italian Parmesan Chips
Add Italian herbs and parmesan for savory richness.
Sweet Cinnamon Chips
Coat slices with cinnamon and coconut sugar for a dessert-like snack.
Gourmet Upgrades
- Truffle salt & cracked pepper for luxury flavor
- Smoky paprika & lime zest for a tangy kick
- Lemon-pepper blend for light, refreshing crunch
Nutritional Breakdown
On average, a 15-chip serving has:
- Calories: 35–45
- Carbohydrates: 4g
- Fiber: 1.5g
- Protein: 1g
- Fat: 3g
Zucchini also provides:
- Vitamin A & C
- Potassium
- Antioxidants
Compared to potato chips, zucchini chips are significantly lighter in calories, sodium, and saturated fat.
Storage and Shelf Life
- Store in an airtight container at room temperature for 2–3 days.
- Add a paper towel to absorb any residual moisture.
- To re-crisp, heat in a 200°F oven for 5–10 minutes.
- Avoid freezing—they lose crunch after thawing.
Serving Suggestions
- Pair with hummus, guacamole, or salsa for dipping.
- Use instead of croutons in salads.
- Serve alongside sandwiches or wraps.
- Crumble as garnish on creamy soups.
- Add to snack boards with fruit, cheese, and nuts.
Meal Prep Benefits
- Easy to make in large batches.
- Cost-effective compared to store-bought healthy snacks.
- Keeps cravings in check with ready-to-eat options.
- Versatile flavors prevent boredom.
Frequently Asked Questions
Q1. Why aren’t my zucchini chips crispy?
Common reasons: slices too thick, not dried enough, too much oil, or oven too hot.
Q2. Can I make zucchini chips without oil?
Yes—just bake on parchment. They’ll be slightly less crisp but lower in calories.
Q3. Can I use yellow squash instead of zucchini?
Yes, same method works perfectly.
Q4. How long do zucchini chips last?
Best within 2–3 days. Re-crisp in oven if needed.
Q5. Are zucchini chips kid-friendly?
Absolutely. Kids love dipping them in sauces like ranch or ketchup.
Conclusion
Healthy snacking doesn’t have to mean giving up flavor or crunch. With Crispy Zucchini Chips, you get the best of both worlds: a crunchy, customizable snack that fuels your body with vitamins and antioxidants instead of empty calories.