
Imagine this: You’re craving something rich, indulgent, and satisfying—but the thought of turning on the oven on a hot summer day makes you reconsider. Enter the hero of effortless desserts: Kiksekage, also known as Chocolate Biscuit Cake. Originating from Denmark, this no-bake delight combines layers of crisp biscuits and silky chocolate cream to create a dessert that is as stunning as it is simple.
In this comprehensive guide, we’ll explore everything you need to know to make the perfect Kiksekage—from ingredient substitutions and step-by-step preparation to serving ideas, expert tips, storage guidelines, and nutrition. Whether you’re new to no-bake desserts or looking for a sophisticated dessert to impress your guests, this recipe will become your go-to indulgence.
🍫 What is Kiksekage?
Kiksekage (pronounced “kiks-kay-geh”) directly translates from Danish as “biscuit cake.” It’s a nostalgic treat across Scandinavian homes, often served during birthdays, holidays, and cozy family gatherings. Its signature texture—crisp biscuits softened by rich chocolate layers—is what makes this dessert uniquely satisfying.
Unlike traditional baked cakes, Kiksekage is refrigerated to set, resulting in a firm, sliceable texture that’s deeply chocolatey and melt-in-your-mouth soft.
📝 Why You’ll Love This Recipe
- ✅ No Oven Required – Perfect for warm weather or quick kitchen prep
- ✅ Beginner-Friendly – Foolproof steps and minimal equipment needed
- ✅ Customizable – Make it gluten-free, vegan, or boozy with easy swaps
- ✅ Make-Ahead Magic – Ideal for prepping a day before events
- ✅ Elegant Yet Effortless – Looks impressive, tastes like a dream
🧾 Ingredients You’ll Need
Classic Ingredients
| Ingredient | Quantity | Notes |
|---|---|---|
| Milk Chocolate | 240g (8.5 oz) | Use high-quality bars, not chips |
| Unsalted Butter | 120g (1/2 cup) | Room temperature |
| Icing Sugar | 120g (1 cup) | Also known as powdered sugar |
| Double Cream | 240ml (1 cup) | Can substitute with heavy cream |
| Rectangular Biscuits | 360g (approx. 2 packets) | Lotus Biscoff, digestive biscuits, or graham crackers |
| Vanilla Extract | 1 tsp | Optional, for aroma and depth |
| Pinch of Salt | – | Enhances chocolate flavor |
🔄 Optional Ingredient Swaps
| Original | Substitute | Notes |
|---|---|---|
| Milk Chocolate | Dark or White Chocolate | For deeper or sweeter flavor |
| Butter | Plant-based butter | For dairy-free |
| Cream | Coconut Cream | For vegan version |
| Biscuits | Gluten-free cookies | For gluten intolerance |
| Vanilla Extract | Coffee liqueur | For adults-only twist |
🧑🍳 Equipment You’ll Need
- Loaf pan (9×5 inch recommended)
- Mixing bowls
- Electric hand mixer or whisk
- Spatula
- Parchment paper
- Microwave-safe or double boiler for melting
🧁 How to Make Kiksekage: Step-by-Step Guide
✅ Step 1: Prepare the Chocolate Base
- Melt the Chocolate
In a microwave-safe bowl, break the chocolate into small pieces. Microwave in 30-second intervals, stirring each time until smooth. Alternatively, use a double boiler for a gentle melt. - Cream Butter and Sugar
In a separate bowl, use a mixer to beat the softened butter and icing sugar until light and fluffy (about 3–4 minutes). - Combine Chocolate and Cream
Slowly add the melted chocolate to the butter mixture while continuously mixing. Blend until smooth and uniform. - Whip the Cream
In a separate bowl, whip the double cream until soft peaks form. Gently fold it into the chocolate mixture with a spatula. Avoid overmixing to retain airiness.
✅ Step 2: Assemble the Cake
- Line the Loaf Pan
Use parchment paper, letting it hang over the edges to help lift the cake out later. - Layer the Ingredients
- Spread a thin layer of chocolate cream on the base.
- Add a layer of biscuits (trim to fit if needed).
- Spread another layer of chocolate cream.
- Repeat until all ingredients are used, ending with a chocolate layer on top.
- Chill to Set
Cover with plastic wrap and refrigerate for at least 6 hours, preferably overnight, to allow the layers to firm up and flavors to meld.
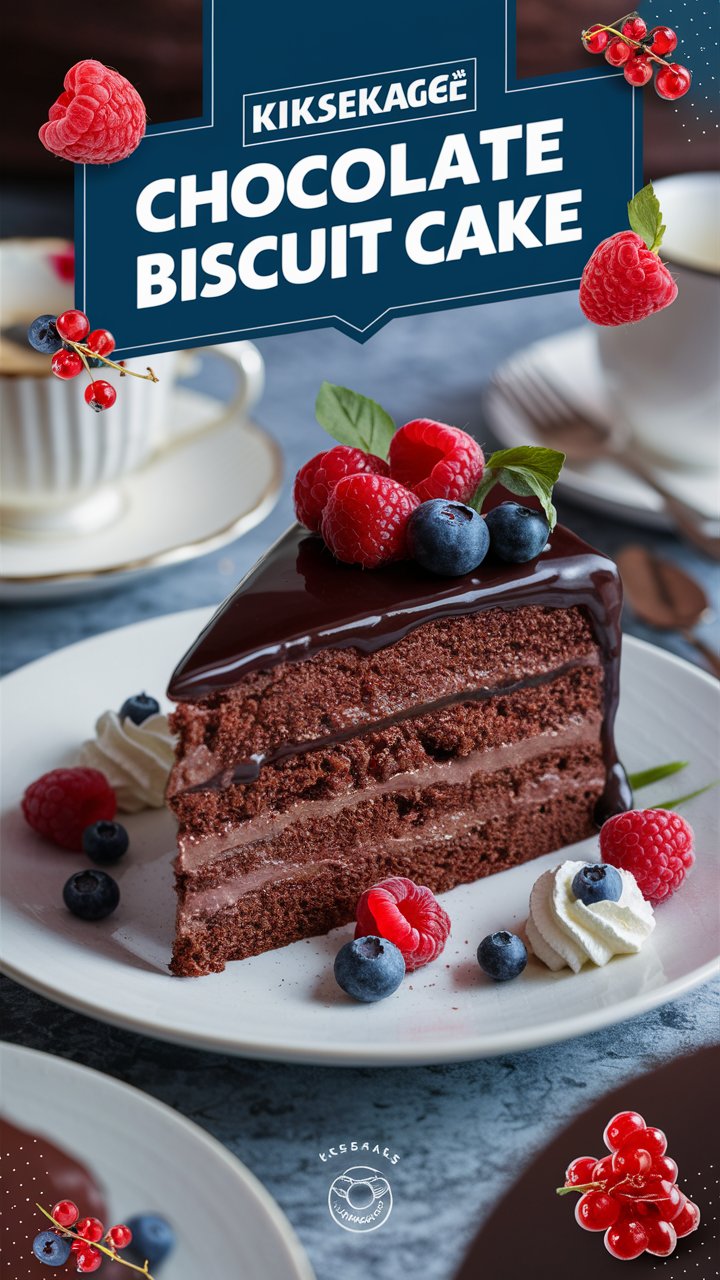
🎨 Decorating Ideas
Make your Kiksekage visually appealing with simple decorations:
- Dust with cocoa powder or icing sugar
- Sprinkle grated chocolate or chocolate curls
- Add fresh berries or mint leaves
- Use whipped cream swirls and edible flowers
☕ Best Ways to Serve Kiksekage
- 🍓 With fresh strawberries or raspberries on the side
- ☕ With a cup of espresso or black tea
- 🍨 With a scoop of vanilla ice cream
- 🎉 As an elegant slice on a dessert platter
- 🧊 Straight from the fridge on a hot day
💡 Pro Tips for Success
- Use quality chocolate – Your dessert is only as good as your ingredients.
- Room temperature butter is essential for a smooth, fluffy texture.
- Don’t overmix – Especially when folding whipped cream.
- Let it set fully – No shortcuts here; it needs at least 6 hours.
- Slice with a hot knife – Dip in warm water and wipe clean between cuts.
🧮 Nutritional Information (Per Slice – Approx. 10 slices)
| Nutrient | Amount |
|---|---|
| Calories | 385 kcal |
| Total Fat | 24g |
| Saturated Fat | 15g |
| Carbohydrates | 40g |
| Sugars | 24g |
| Protein | 3g |
| Sodium | 195mg |
| Cholesterol | 58mg |
Note: Nutritional values may vary based on brands and substitutions.
🧊 Storage & Make-Ahead Tips
- Refrigerator: Keeps fresh in an airtight container for up to 5 days.
- Freezer: Slice, wrap in plastic wrap and foil, and freeze for up to 3 months.
- Serving from frozen: Thaw overnight in the fridge or leave at room temperature for 1 hour.
❓ Frequently Asked Questions
Q1: Can I make it without cream?
Yes! You can use whipped coconut cream, mascarpone, or even thick Greek yogurt for a different texture.
Q2: Is this recipe kid-friendly?
Absolutely. If omitting alcohol-based flavorings, this is a fantastic dessert for kids’ parties.
Q3: Why is my Kiksekage too soft?
It likely hasn’t set long enough. Make sure your cream is whipped to soft peaks and refrigerate for 6+ hours.
Q4: Can I make a gluten-free version?
Yes, simply swap the biscuits with a gluten-free alternative.
Q5: What’s the best chocolate to use?
Opt for high-quality milk or dark chocolate with at least 35–45% cocoa content for the best flavor.
🌍 Cultural Background of Kiksekage
Kiksekage has its roots in Scandinavian family kitchens, particularly Denmark, where “fridge cakes” are beloved for their simplicity. Historically, these cakes were made during warmer months or when baking ingredients were scarce. Over time, it has gained popularity across Europe, especially in Germany, Italy, and the UK where similar versions exist (e.g., Kalter Hund, Tiffin, or Biscuit Salami).
📝 Reader Challenge: Try These Fun Variations!
- Mocha Kiksekage: Add 1 tbsp of espresso to your chocolate mix.
- Nutty Delight: Sprinkle chopped hazelnuts or almonds between biscuit layers.
- Vegan Version: Use plant-based cream, butter, and dark chocolate.
- Mint Chocolate: Add a drop of peppermint extract for a refreshing twist.
- Spiced Layer: Mix cinnamon or chili powder into the chocolate for a surprise flavor.
🧠 Final Thoughts: A Cake Worth Chilling For
Whether you’re a seasoned home baker or a kitchen novice, this Kiksekage ~ Chocolate Biscuit Cake offers a fail-proof path to dessert heaven. Its combination of crunchy biscuits and creamy chocolate is hard to beat—no oven required.
Its Danish roots, customizable nature, and indulgent taste make it more than just a dessert; it’s a conversation starter, a comfort dish, and an ode to sweet simplicity.